Life Style
Polished Corners and Bold Frames: Fresh Interior Design Photography Ideas for the Inquisitive Eye
Published
24 hours agoon
By
IQnewswire
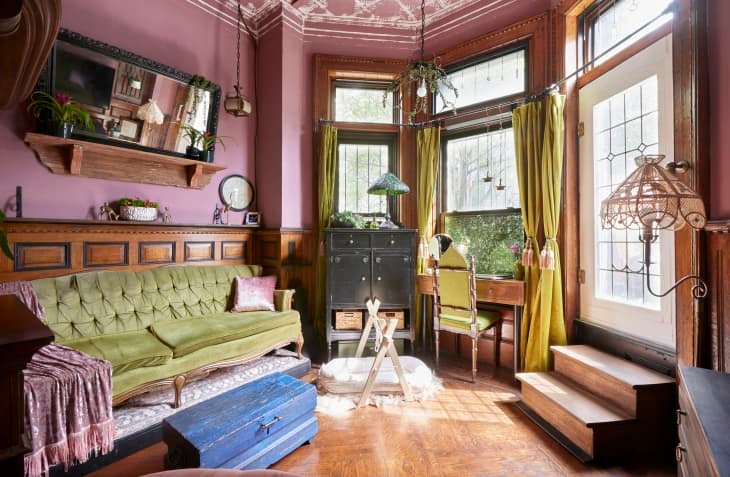
You’ll hear stories in the hum of floorboards, sunlight threading its way across patterned curtains, geometries playing along skirting boards, the home talks if you know how to capture its language. Interior design photography isn’t quiet craftsmanship, it’s drama with every shutter press. In the UK, where terraced townhouses huddle as tightly as commuters, every corner craves its own limelight. Your lens isn’t a window, it’s the storyteller with a thousand perspectives.
Photography of interiors holds power, a painter’s brush for those who like order or chaos, who see warmth in a lampshade or clarity in hard-edged granite. Do you find yourself looking for stories beneath the surface? The following ideas and insights should help shape your own vision, revealing interiors in ways others might overlook.
Looking at Interior Design Photography
What sets interior design photography apart? It’s less about fixed frames and more about letting a room reveal itself. You will find that light, furniture, and even the weather outside can coax a different mood from familiar walls. This style isn’t for the passive observer. It draws you into the fabric of a home, whether that’s the worn grain of an oak banister or the gleam of chrome in a city kitchen.
Rooms never sit still, no matter how much you tidy. Dust catches sunlight. A cushion falls out of symmetry. Your task? To document spaces as living scenes rather than static showrooms. Homes are lived in. You’ll capture energy and flow: notice where people walk, stand, sit, a flow that shapes the entire composition.
In the case that you wish to convince clients or inspire future projects, knowing how to photograph spaces thoughtfully is essential. A single frame can persuade, calm, or spark desire in ways words rarely manage.
Essential Equipment for Interior Photography
Kit matters, but it shouldn’t overwhelm you. Start with a reliable DSLR or a mirrorless camera, full-frame sensors give you the breathing room to embrace shadows and detail. The lens? A wide-angle 16-35mm can work wonders. It embraces more of the space, banishes cramped perspectives, but won’t distort lines if used with care. For tighter vignettes, a 50mm prime lens will help you highlight details: hand-painted tiles, light pooling on velvet, even the drama of a staircase’s curve.
Tripods offer stability for longer exposures. Interiors can be dim, especially on rainy days British weather grants you. You might also keep a polarising filter handy to tame reflections on glass or lacquered surfaces. And a remote trigger? Not glamorous, yet invaluable for shake-free shots. You don’t need a flight case full of gear. Instead, aim for versatility, your eye and timing will always matter more than kit weight.
Lighting Techniques for Stunning Interiors
Natural light will be your friend and trickster. You’ll see how northern light in a Victorian terrace reads cool and calm, while west-facing windows might throw golden dramas onto a kitchen floor. You can’t control the sun, but you can work around it: shoot in the early morning for crispness, late afternoon for softness.
Draw the curtains just so, diffusion softens harsh contrast. If daylight fails, LED panels can work nifty magic: position them as you would mimic a window. Avoid using a direct flash, as it flattens layers and erases the soul from fabrics and finishes.
You might move through a scene, watching how the light bends and flows. Let it fall across textures, velvet, brass, glossy metro tiles. That’s where you’ll find the mood of the room. Don’t be afraid to work patiently. Sometimes, a sudden glint is more profound than any grand light plan.
Mixing light sources? Keep an eye on white balance. A tungsten lamp in a blue-lit room can confuse your camera, but you will find custom white balance settings keep things faithful to your eye.
Styling Tips to Enhance Interior Shots
You’ll discover that moving a mug, folding a throw, or placing a single book on a side table can transform an entire photograph. In the case that a room feels stale, inject life, a fresh bunch of daffodils, a lived-in mug, or a softly rumpled cushion. Lived detail gives comfort.
Visual clutter is another thing entirely. You can edit piles of letters or wayward shoes out of the story. Less is truly more here, let the lines of the room breathe. For kitchens, fruit or herbs hint at activity, while bedrooms often look most inviting with textured throws and sunlight falling across the bed.
When you style, don’t subtract personality. Instead, coax authenticity from the space. Peek into corners for vignettes, cluster objects in odd numbers, allow negative space between showstoppers. You will find viewers want real spaces, not museum pieces.
Creative Composition and Angles
Consider every room as a puzzle of light, shadow, depth, and story. You might crouch low, letting skirting boards run as guiding lines, or shoot from a doorway for that glimpse-through-the-threshold effect. Corners can add intrigue, while central shots display order and symmetry, think grand dining rooms or long halls.
Break symmetry on occasion, though. Position a vase or lamp off-centre for tension. You will get dramatic depth by shooting along furniture lines, sofas become rivers, tables a marching parade of forms.
Height matters. Photographs taken too high or too low can distort reality. Eye-level shots suit most setups, but feel free to lower your stance if you wish to highlight dramatic ceilings or patterned floors. Flat-lays work wonders for detail shots: plates on tables, fabric swatches, trailing houseplants creeping into frame.
Reflect on leading lines and how your positioning can draw the eye to focal points, a fireplace, an accent chair, a piece of striking artwork. This play of angles and lines is where your personal signature forms.
Post-Production Editing Tips
Editing seals the deal, but subtlety reigns. You will want to balance bright and shadowed parts so that the room feels as inviting as in real life. Lightroom or Photoshop might become your digital darkroom. Straighten lines first, wonky walls spoil professionalism. Look for dust spots, rogue wires, any intrusions unfamiliar to the room’s narrative.
Boost clarity gently, teasing out texture from wood and fabric. Don’t over-saturate. The palette should match the in-person mood, not turn every room neon. Cropping can focus a viewer’s eye, remove distractions lurking at the frame’s edge.
You might also layer on gentle sharpening, allowing pattern and detail to snap into relevance. Still, restraint is key. Over-editing can douse the character that made you reach for your camera in the first place.
Final Thoughts
You may begin to look at your living spaces differently after photographing them. What was once just a hallway can turn into a forest of light and geometry. Rooms have stories, sometimes whispering, sometimes grand. In the case that you pursue interior design photography for work or pleasure, you’ll see there’s delight in capturing that fleeting conversation between the old and new, the bright and the dim.
With ideas brimming and your own perspective close at hand, don’t hesitate to challenge what interiors can be in a photograph. Make room for experiment, and let your curiosity become part of the scene. No two rooms need be alike under your lens. Isn’t that what draws you in, time and again?

Elgin Charles Williams: The “Emperor of Hair” and Jackée Harry’s Former Husband

Who Is Nicole Frangipane? Inside the Life of Halsey’s Amazing Mom

Lilly Wachowski’s Wife Alisa Blasingame: A Love Story Few Know

What Really Happened Between Brandi Padilla and Kevin Garnett?

Who Is Kevin Lazan? Everything About Rachel Platten’s Husband

Meet Henry Olyphant: The Private Son of a Hollywood Star

The Impact of Direct Mail Marketing in the Healthcare Sector

Best DVD to MP4 Converters for Windows & Mac in 2025

Polished Corners and Bold Frames: Fresh Interior Design Photography Ideas for the Inquisitive Eye

Best Sites to Buy Reddit Upvotes (Real & Instant)

Carol Kirkwood’s Journey: Her Real Age, Husband, Career, and More

Revolutionizing Healthcare: The Emergence of AI-Driven Analytics

How Machine Learning and AI are Redefining the Future?

Aliza Barber: Meet Lance Barber’s Wife, Age, Life, Profile, Career and Net Worth

Evelyn Melendez: Jordan Knight’s Wife Bio, Marriage, Family, Career and Net Worth

Ilan Tobianah Biography: Family, Marriage, Lifestyle, Career and Net Worth

Who was Alice Marrow? Everything to Know About Ice-T’s and His Mother

King Von’s Autopsy Report: The Truth Behind the Tragic Death

Meet Otelia Cox: The Supportive Wife of Tony Cox – A True Fairy Tale Romance

Tea Leoni and Tim Daly Split – A Closer Look at Their Relationship and Breakup

Elgin Charles Williams: The “Emperor of Hair” and Jackée Harry’s Former Husband

Who Is Nicole Frangipane? Inside the Life of Halsey’s Amazing Mom

Lilly Wachowski’s Wife Alisa Blasingame: A Love Story Few Know

What Really Happened Between Brandi Padilla and Kevin Garnett?

Who Is Kevin Lazan? Everything About Rachel Platten’s Husband

Meet Henry Olyphant: The Private Son of a Hollywood Star

The Impact of Direct Mail Marketing in the Healthcare Sector

Best DVD to MP4 Converters for Windows & Mac in 2025

Polished Corners and Bold Frames: Fresh Interior Design Photography Ideas for the Inquisitive Eye

Best Sites to Buy Reddit Upvotes (Real & Instant)
Category
Trending
-

 News2 months ago
Carol Kirkwood’s Journey: Her Real Age, Husband, Career, and More
-

 Health2 years ago
Revolutionizing Healthcare: The Emergence of AI-Driven Analytics
-

 Technology2 years ago
How Machine Learning and AI are Redefining the Future?
-

 Celebrity1 year ago
Aliza Barber: Meet Lance Barber’s Wife, Age, Life, Profile, Career and Net Worth


